Recovery rides don’t need to be completely passive.
The primary purpose should always remain recovery, but an easy ride also gives you an excellent opportunity to work on aspects of your cycling technique without adding unnecessary training stress.
That’s the idea behind this week’s Recovery Ride with Technique.
The session combines very easy Level I-II riding with four short periods at Level II where you’ll increase your cadence to 100–110rpm. The intensity remains controlled throughout, but the cadence changes give you an opportunity to practise pedalling smoothly and efficiently at a higher leg speed.
With 40 minutes of riding, this is deliberately one of the easier Sunday Smart-Trainer Sessions—and that’s exactly the point.
Session Inspiration
The starting point for this workout came from Tyler, the AI workout builder within Training Tilt.
I occasionally use tools like this to generate ideas or provide a starting point for a workout. However, an AI-generated workout isn’t something I simply prescribe to an athlete without considering what I’m actually trying to achieve.
Once Tyler produced the initial session, I manually modified the workout to create the recovery and technique session I wanted.
The result is a simple workout with a very specific purpose: promote recovery while using higher-cadence riding to reinforce good pedalling technique.
Today’s Workout
Recovery Ride with Technique
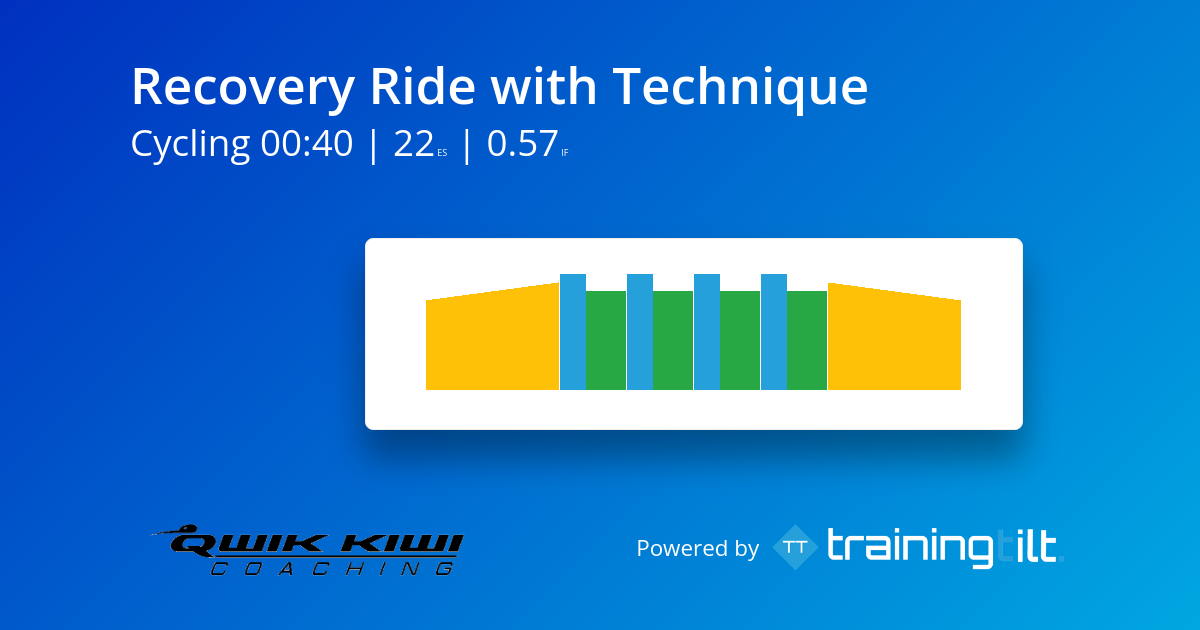
Warm-Up
- 10min Level I-II (50–60% FTP)
Main Set – 4x:
- 2min Level II (60–70% FTP) @ 100–110rpm
- 3min Level I-II (50–60% FTP) @ 90–100rpm
Cool-Down
- 10min Level I-II (50–60% FTP)
Post-Ride
- 10min Stretching
Total Riding Time: 40 minutes
Why You’re Doing This Session
The most important word in the title is Recovery.
This isn’t a workout where you’re trying to generate a large training load. It’s designed for those occasions when you want some gentle movement through the legs without adding significant fatigue.
Easy cycling can increase blood flow and keep the legs moving while placing relatively little stress on the body. But rather than simply spinning away for 40 minutes, I’ve included some controlled cadence work to give the session a secondary technical purpose.
During each two-minute Level II effort, you’ll increase your cadence to 100–110rpm.
The objective isn’t to produce more power. Instead, you’re practising your ability to turn the pedals quickly while keeping your upper body relaxed and your pedal stroke smooth.
After each higher-cadence effort, you’ll return to Level I-II for three minutes and bring your cadence back to 90–100rpm.
The result is a workout that keeps your legs moving without losing sight of the reason you’re on the bike in the first place: recovery.
What You Should Focus On
Start with 10 minutes at Level I-II, keeping the effort genuinely easy and your cadence above 90rpm.
As you move into each two-minute Level II effort, gradually increase your cadence into the 100–110rpm range.
Don’t suddenly accelerate your legs to 110rpm. Build into it smoothly.
Once you’re there, concentrate on keeping your hips stable and your upper body relaxed. If you find yourself bouncing in the saddle, gripping the handlebars tightly or becoming tense through your shoulders, bring the cadence down slightly until you regain control.
During each three-minute Level I-II section, reduce your cadence to 90–100rpm and allow your legs to settle.
Remember that the higher cadence shouldn’t turn these two-minute repetitions into hard efforts. Cadence is the challenge—not power.
Common Mistakes To Avoid
Riding too hard. This is the biggest mistake you can make. A recovery ride that leaves you more fatigued than when you started has missed its purpose.
Increasing power with cadence. When you increase your leg speed, resist the temptation to simultaneously push harder against the pedals. Keep the intensity within Level II.
Chasing 110rpm at all costs. The prescribed cadence is a range, not a competition. If you can’t ride smoothly at 110rpm, stay closer to 100rpm and prioritise technique.
Bouncing in the saddle. This usually indicates that your cadence has exceeded your ability to control the pedal stroke. Reduce your cadence slightly and concentrate on smoothness.
Turning the final repetition into a test. There’s no finishing sprint and no need to prove anything. Finish the fourth repetition with the same control you demonstrated during the first.
Coach Ray’s Tips
A good recovery ride should leave you feeling better when you get off the bike than you did when you got on.
That’s the standard I’d use to judge this workout.
Don’t worry about average power, speed, distance or accumulating training load. None of those numbers are the objective today.
Instead, pay attention to how your legs feel and how smoothly you can pedal.
During the higher-cadence sections, imagine your feet moving smoothly around the pedal stroke rather than simply pushing down harder. Keep your shoulders relaxed, your hands light on the handlebars and your hips as stable as possible.
Higher cadence isn’t automatically better. The goal is to expand the range of cadences you can ride comfortably and efficiently, while keeping the overall physiological demand low.
Most importantly, respect the easy day.
You don’t become fitter only from the hard workouts. You improve when your body has the opportunity to recover and adapt from them.
Coach Ray Rode This Session
I don’t just write these workouts—I ride them as well.
I’ve completed Recovery Ride with Technique, and this is a good example of a session where the numbers shouldn’t necessarily look impressive. That’s not what we’re trying to achieve.
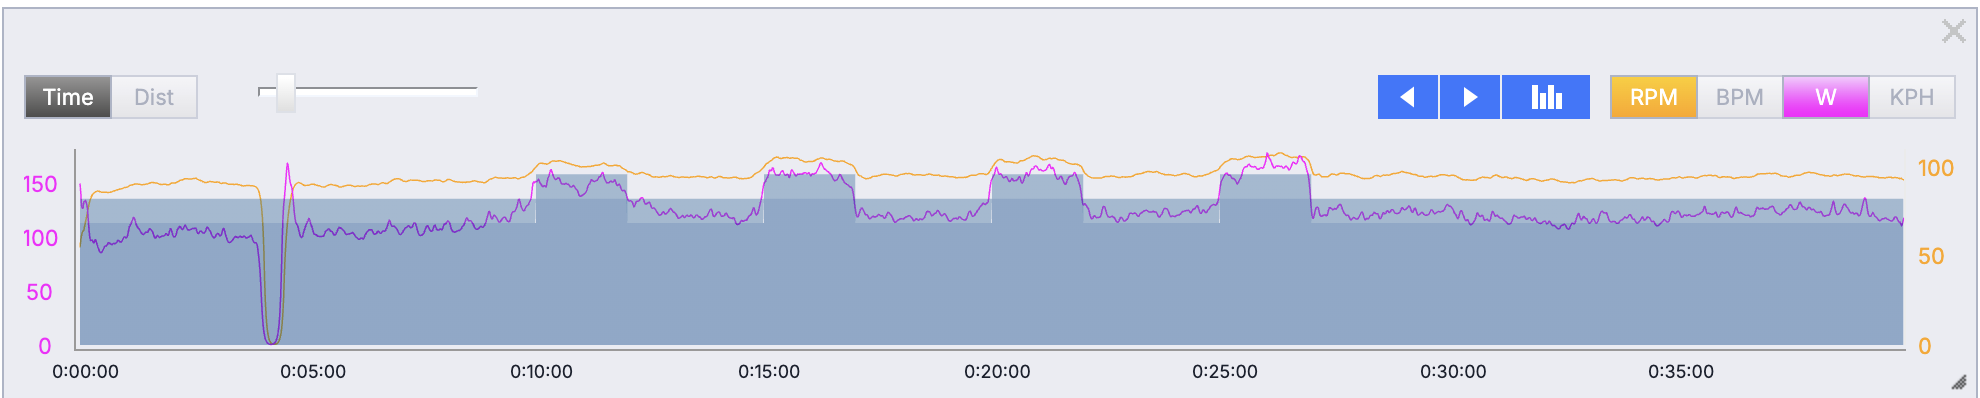
When reviewing a recovery ride like this, I’m not looking for a high average power, a big Training Stress Score or a collection of personal bests.
Instead, I’m looking for evidence that I kept the intensity under control while successfully completing the technical component of the workout.
In particular, look at the four higher-cadence repetitions. Did you keep the power within Level II while increasing your cadence to 100–110rpm? Were you able to return to Level I-II afterwards rather than allowing the intensity to creep upwards?
And perhaps the most important question:
Did you finish the session feeling better than when you started?
If you did, the workout has probably achieved exactly what it was designed to do.
Ride Recovery Ride with Technique on Velocity
Want to ride the exact session rather than building the workout yourself?
I’ve recorded Recovery Ride with Technique on Velocity, so you can simply jump on your indoor trainer and ride the session with me.
👉 Ride Recovery Ride with Technique on Velocity here:
https://app.vqvelocity.com/vod/12313?s=eapbh1
I’ll coach you through the workout while Velocity displays the session structure and training data on screen, allowing you to concentrate on what matters: keeping the intensity easy and making those higher-cadence efforts as smooth and controlled as possible.
This is particularly useful for a recovery session because it’s very easy to get carried away when riding on your own. I’ll help keep you focused on the purpose of the workout rather than turning an easy day into another hard training session.
New to Velocity?
If you don’t already have a Velocity account, you can get 14 days of free riding through Qwik Kiwi Coaching.
👉 Start your FREE 14-day Velocity trial here:
http://app.vqvelocity.com/join?a=rhs956
Then come back and ride Recovery Ride with Technique with me.
Remember, this isn’t a session where finishing exhausted earns you extra points.
Ride easy. Pedal well. Recover better.